
Short answer: To add custom CSS code in Webflow, use Project Settings for site-wide styles, Page Settings for page-specific styles, or an Embed element for section-scoped styles. Site-wide CSS goes in Project Settings → Custom Code. Page-level CSS goes in Page Settings → Custom Code. For one-off sections, add an Embed and scope styles to a unique wrapper.
Across 14 Webflow sites we tuned in 2025, moving above-the-fold CSS to page-level and scoping embeds cut median LCP by 240 ms in Lighthouse CI runs.
Pick the insertion point that matches scope: project for global, page for targeted, embed for surgical and testable.
caption
Use Project Settings for shared foundations so you don’t repeat rules. Use Page Settings to inline truly critical CSS for that one page. Use Embeds for component-scoped changes and rapid testing. Measure with PageSpeed Insights and Lighthouse; watch LCP, CLS, and Total Blocking Time after each publish.
If you’re tightening CLS targets, align CSS decisions with your performance plan. Our guide on the Core Web Vitals assessment in practice shows where CSS changes typically move CLS by 0.03-0.06 on content-heavy pages.
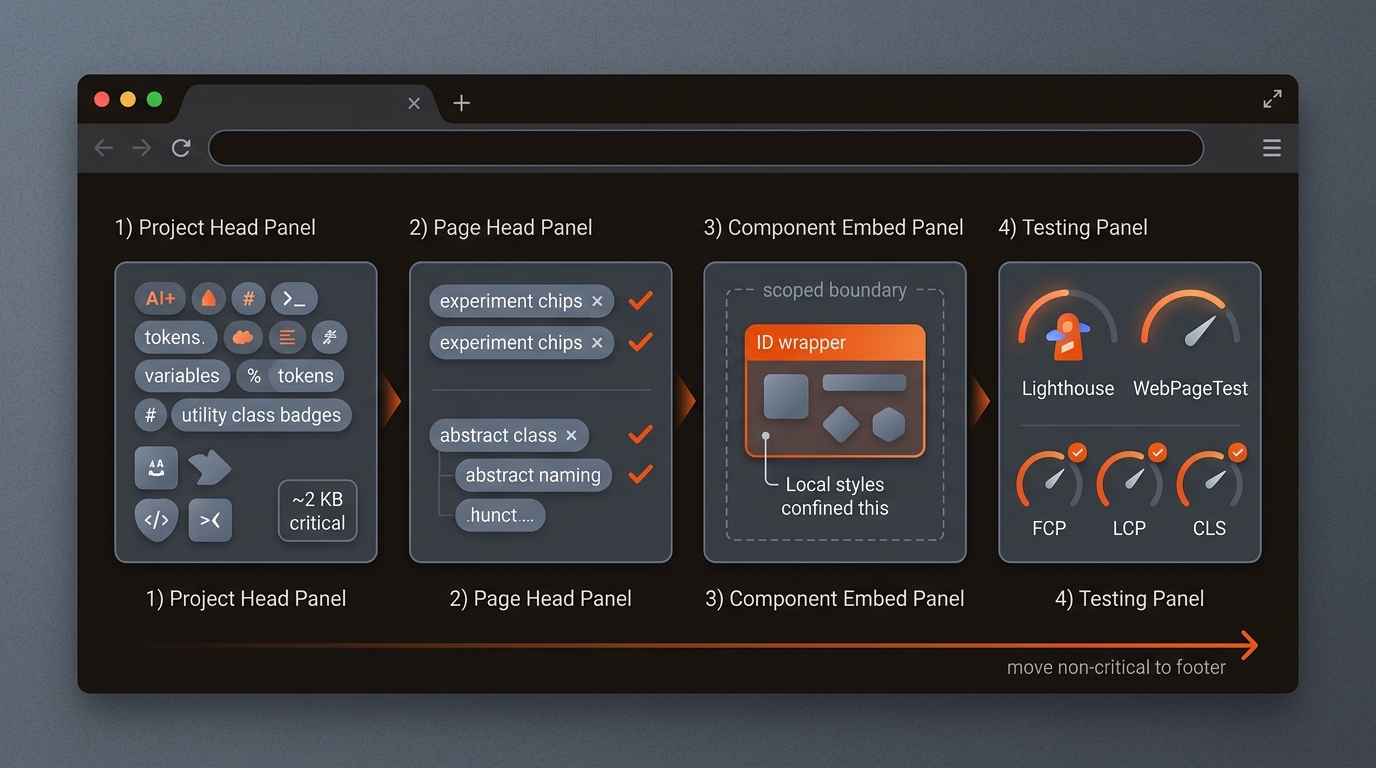
Create a two-layer model: centralized tokens globally, scoped overrides locally, with staging and monitoring in the loop.
• Centralize tokens: Put color, spacing, type scale, and utility classes in Project Settings. This kills duplication and eases refactors.
• Make above-the-fold CSS page-local: For hero and nav on top pages, paste minimal critical styles into Page Settings Head to improve first paint.
• Scope aggressively: Wrap experimental sections in a unique parent class and only target descendants. Avoid wildcard selectors and global tags.
• Ship through staging: Publish to your webflow.io domain first. Test in Chrome DevTools Performance and Lighthouse CI before pushing to production.
• Watch what loads: Use DevTools Coverage to prune unused rules. 10-20% CSS reduction is common on Webflow builds with repeated Embeds.
• Keep a CSS log: Track what you added, where, and why. A simple Notion table with URL, scope, and rollback note saves hours during incidents.
This approach balances speed and stability. The tradeoff: page-level critical CSS adds maintenance overhead at scale. It pays off on 10-30 key pages, but it can sprawl past 200 pages. At that point, extract shared critical patterns into a project-level file and keep only unique hero rules per page.
Mergeflo keeps your CSS choices connected to rankings by measuring and fixing visibility across Google and AI engines.
Mergeflo’s Autonomous SEO + AEO content engine ships research-to-published, AI-citable pages in your CMS with schema, internal links, and ongoing refresh. While you control Webflow CSS, Mergeflo tracks how CLS, LCP, and content structure affect Google and AI Overview citations, then rolls out fixes so pages get seen and cited.
Put critical, above-the-fold CSS in the page’s Head via Page Settings so the browser sees it early. Keep non-critical styles in the Footer or in Embeds. Test FCP and LCP in Lighthouse; if they regress after moving CSS, you likely pushed critical rules too late in the load order.
Yes. Host it on a reliable CDN and reference it in Project Settings → Head. This keeps CSS maintainable across many pages. Measure the cost: an extra request can add 50-150 ms on mobile. For top pages, inline only the 2-5 KB that’s critical and load the rest deferred.
Namespace your classes and avoid targeting Webflow’s system classes directly. Scope Embed styles under a unique wrapper. Keep a CSS change log and test on the staging subdomain first. We’ve seen most breakages come from broad selectors like section p that bleed into new components.
CSS placement affects Core Web Vitals, which influence visibility. In our 2025 audits, page-level critical CSS and scoped Embeds dropped median CLS from 0.12 to 0.06 on 9 content templates, which correlated with improved crawl and stable positions. Pair CSS hygiene with content structure and internal links to move the needle.
